Amazon Connection
Step One | Connect Amazon & eBay to inkFrog
In the dynamic landscape of e-commerce, managing multiple sales channels efficiently is essential for maximizing sales and maintaining a competitive edge. inkFrog, a powerful eBay listing tool, can be seamlessly integrated with Amazon to streamline your online business operations. Let’s explore how straightforward it is to use inkFrog with Amazon and enhance your e-commerce endeavors.
To get started, you need to link and authorize your eBay and Amazon seller accounts with inkFrog.
Show me how
Amazon Account Types
The account types Amazon allows for this type of connection are at least one of the following:
- Non-individual Selling on Amazon account
- Amazon Payments account
- Amazon Fresh account
- Amazon Prime Now account
- Sellers with only individual Selling on Amazon accounts are not eligible unless they sell on Amazon India.
Step Two | Amazon Sync Settings
If you manage inventory within Amazon, you can synchronize inventory between inkFrog and Amazon in both directions. Furthermore, inkFrog offers the capability to synchronize orders with Amazon. By activating this feature, inkFrog will generate orders within Amazon for products shipped using FBA.
For products not shipped through FBA, orders will not be automatically generated within Amazon. You'll need to manage these orders through either inkFrog or eBay.
Show me how
Before you make any changes to your Sync Settings, it's crucial to understand how they can impact your current and future product listings on eBay and Amazon. Adjusting these settings may affect product quantities, prices, titles, and descriptions. Take the time to thoroughly review and comprehend the potential impacts before making any modifications.
Step Three | eBay Default Listing Settings
During this step, you'll configure the default listing settings for your eBay products. These settings will establish default shipping, payment, and return profiles within your inkFrog account. You can adjust these profiles anytime by accessing the "Profiles" option in the navigation menu within your inkFrog account.
Show me how
Step Four | Importing from Amazon
To import products, simply select the products you want to import from the list and click the "Import Selected" button. You can also import all products by clicking the "Import All" button.
If you are importing FBA or FBM products, it is recommended to build the import a second time to show either FBA or FBM products and/or combine additional variants if needed.
After importing the products, they will be available in your inkFrog account and can be listed on eBay using the default listing settings you configured earlier.
Refresh: By selecting this option, the import page will refresh and update the list of available products to import from Amazon. This is useful if you have added new products to Amazon that you want to import into inkFrog.
Rebuild: This option will rebuild all available products for import from Amazon that have not yet been imported into inkFrog. Depending on the number of products, this process could take some time.
Settings: This option allows you to access the initial set-up settings, create additional set-up settings, and access the sync settings.
At this point, it's important to decide if you want to import only FBA or FBM products and whether you want to combine additional variants for your eBay listings or import every variant of every listing as an individual eBay listing.
To make these decisions, you can select the "Rebuild" option on the import page. Then, select the Amazon Marketplace and choose to retrieve products that are FBA only, FBM only, or a combination of both. You should also select the conditions (all is recommended).
You will then be prompted to choose whether to group variants into multi-sku listings for eBay or create separate eBay listings for each variant. If you're not sure, you can choose to select neither and continue with the rebuild.
Keep in mind that depending on your selections and the total number of products in your Amazon account, the rebuild process may take some time to complete. Once it's done, you'll be ready to begin importing from Amazon.

Selecting the correct version of the Amazon product, whether FBA or FBM, is crucial to ensure that you import the correct version for eBay. This is particularly important if you sell the same product both FBA and FBM, and the ASIN is shared between both versions.
If you plan to use the Sync Orders option in inkFrog to sync your eBay orders to Amazon for FBA, then it's recommended to select FBA only. This is because Amazon will not accept FBM orders from inkFrog for fulfillment purposes.
First, select the Amazon Marketplace where your Amazon account is registered.
Next, you may choose to use All Conditions or select new or used, depending on your preferences.
You will then have the option to group variants into multi-sku products. Although this may take longer to rebuild, it can save time later by avoiding the need to manually combine products before importing.
Alternatively, you can choose to create separate listings for each variant, which may be faster if you have many products available on Amazon with multiple variants. If selected, inkFrog will import every variant of every listing as a separate listing for eBay.

You can choose between two options for importing products from Amazon to inkFrog. The first option is "Import all products," which will import all available products from Amazon in a single import. The second option is "Manually select which products to import," which will allow you to choose which products to import from Amazon to inkFrog.

If you’ve chosen to import all available products from Amazon, select the Next button.
If you’ve chosen to manually select which products to import, select the Select Products button
If you’ve selected Import All, you will be at the Review, map, and list page
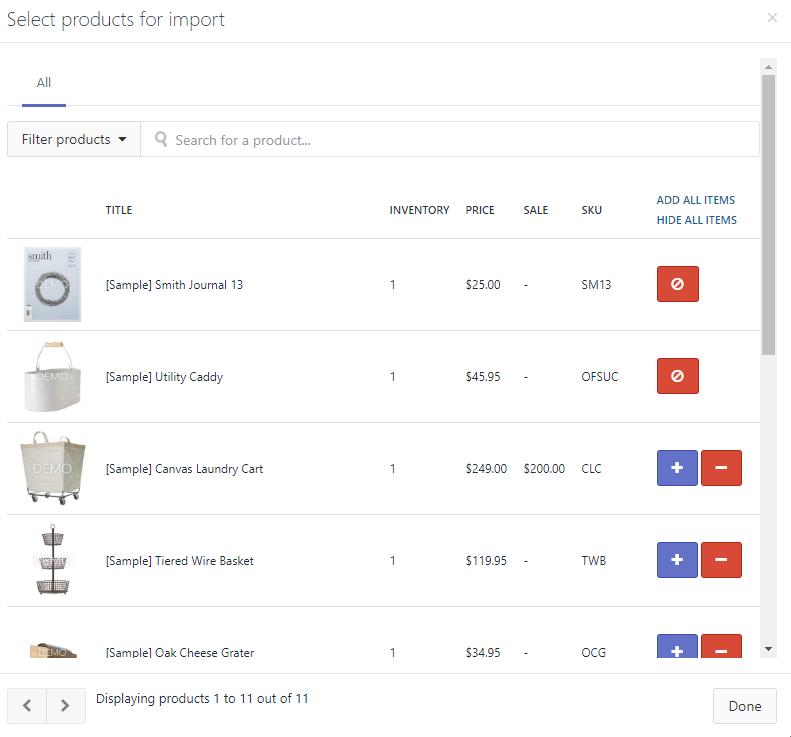
If you’ve chosen Manually Select, you will be at the Select Products page
Prior to selecting the products to import, the ability to set filters or use search keywords to display products that will share the same eBay subcategories is available.
Once listings are selected for import, use the button to the right of each title to select those products for import.
You will find pagination arrows at the bottom left of this window. Complete making the selections, click the Done button.
The products that have been selected for import will appear on the review page, to add additional products to the import, select Add more products.
If the product selections are complete, choose the Next button.

Using eBay's best practices, your products will be listed with a Good 'Til Cancelled listing duration (if available), "New" item conditions, and other item specifics. It's best to review individual listings for accuracy.
eBay categories: Ensure that the category you choose is the most accurate and relevant to your product. This will help potential buyers find your listing more easily.
eBay categories: Ensure that the category you choose is the most accurate and relevant to your product. This will help potential buyers find your listing more easily.
Brands and product identifiers: Make sure that the brand name and any product identifiers, such as UPC or ISBN, are accurate and match the product being listed. This can help with search results and visibility.
Item condition: Choose the most accurate item condition for your product, whether it's new, used, or refurbished. This can affect buyer trust and satisfaction.
Additional item specifics: Provide as much detail as possible about your product to help buyers make informed purchasing decisions. This may include size, color, material, or any other relevant information.
By following eBay's best practices and ensuring that your listings are accurate and detailed, you can increase your chances of success on the platform.

At the review, map, & list page, you may see a few different notifications.
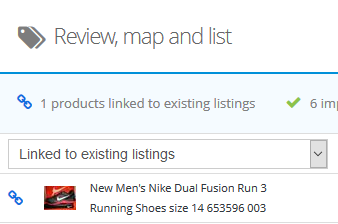
These notifications are indicated by the yellow triangle, orange triangle, blue link, and green checkmark.
These notifications are indicated by the yellow triangle, orange triangle, blue link, and green checkmark.

Yellow Triangle
Orange Triangle
Blue Link
Green Checkmark
On the Review, map, and list page, if you have selected to import products from Amazon that belong to the same eBay category, you can set the category for all these products at once.
Show me how
To bulk set the brand for all listings prior to importing, you can select the title of one product on the left side of the Review, Map, and List page.
Show me how
You’re now ready to finalize the import. Select the Import & List button

After completing the necessary steps such as setting the category, brand, item specifics, and item condition, you can proceed to either import and list the products on eBay or import only.
If you choose to import only, the eBay listings will be created and saved as a draft in your library, ready to be listed at a later time.
If you prefer to import and list the products immediately, select "Import and list to eBay" and acknowledge that eBay fees may apply by checking the box. Then click "Start & List" to publish the listings on eBay.

Send from inkFrog to Amazon (Export Feature)
Prior to selecting eBay listings for the export process, first be sure to review the Sync & Inventory Control Settings - inkFrog > Amazon > Sync & Inventory Control. Be sure that the setting selections are selected for the desired sync between Amazon and inkFrog for eBay.
**Important that the sync & inventory control settings are reviewed / selected for the desired sync. After the export process completes, the product that gets created in Amazon will automatically map/link with the eBay listing inkFrog and will immediately begin to sync between Amazon and inkFrog for eBay based on the Sync & Inventory Control setting selections.
To export your inkFrog eBay listings to Amazon and create new Amazon products, follow these steps:
To export your inkFrog eBay listings to Amazon and create new Amazon products, follow these steps:
- Go to Apps → Channel Connector → Send from inkFrog to Amazon.
- Choose the export options you want, such as the Amazon marketplace, FBA fulfillment, and whether to include HTML in the product descriptions.
- Decide if you want to export all of your eBay listings to Amazon or manually select which ones to export.
- Click the Next button to continue with the export process.
Testing a few listings before exporting all of them to Amazon is highly recommended. This will allow you to review and ensure that the listings are created and displayed correctly on Amazon.
The eBay listings you are trying to export must not already be linked to another store such as Shopify or Bigcommerce.

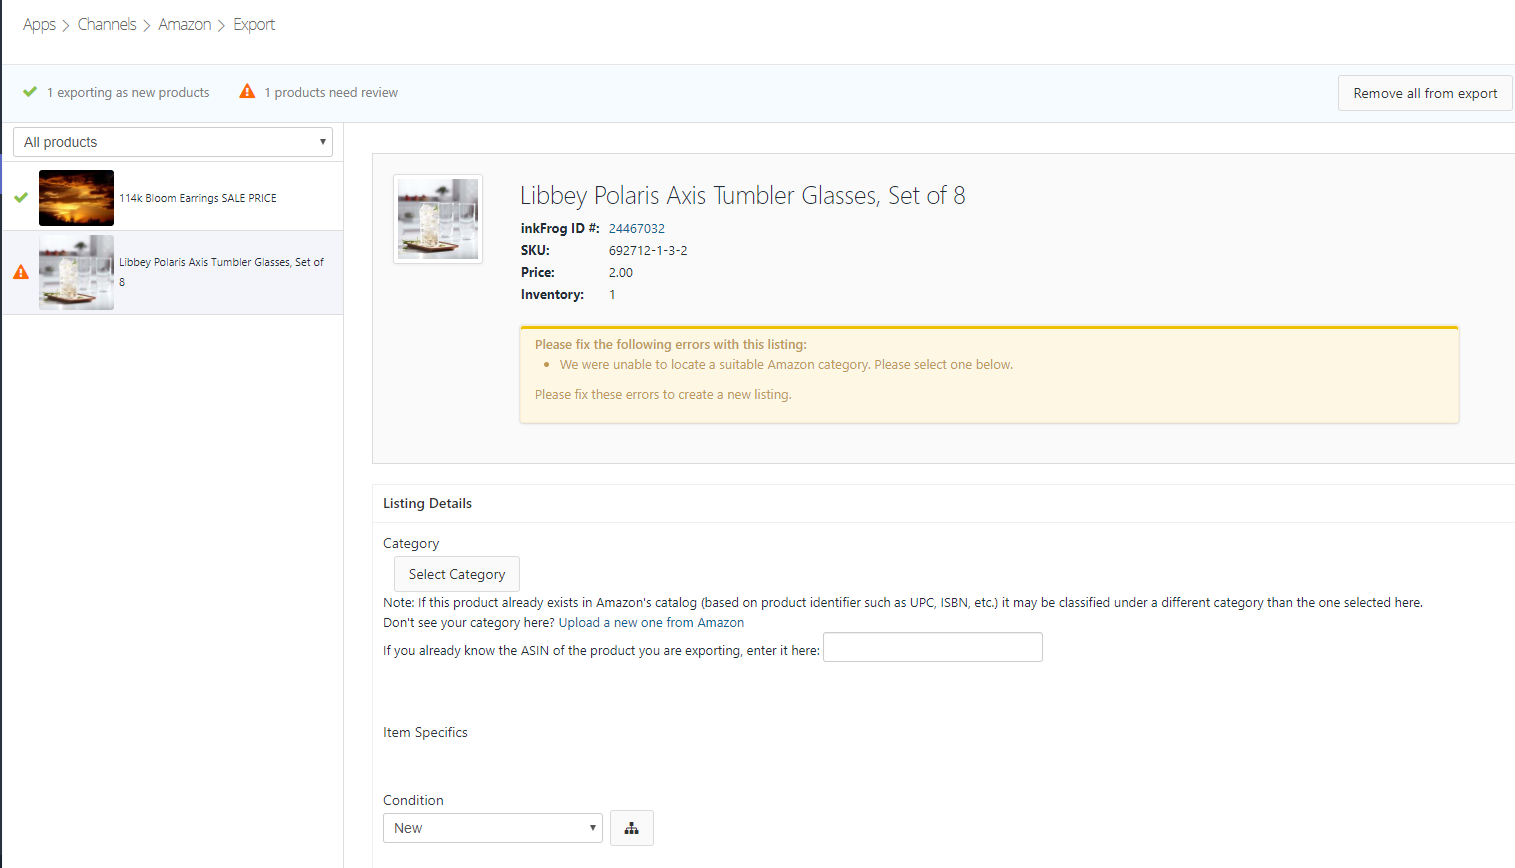
On the review page before exporting to Amazon, your product listings may have a status of "Exporting as new product" or "Needs review".
"Exporting as new product" means the listing is ready to be exported to Amazon without any necessary changes. You can complete the export process immediately. However, if you wish to review the product details before exporting, you can click on the product title.
On the other hand, "Needs review" status indicates that some changes need to be made before exporting to Amazon. To review, click on the product title on the left-hand side, and the product details will appear on the right side of the page.

In the event that an Amazon category needs to be selected for a listing, this information will be displayed on the right-hand side of the title. To choose a category, simply click on the Select Category button.
If the desired category is not visible, you can select the Upload a new one from Amazon link to upload the necessary category. Once uploaded, the category will be available for selection.
Alternatively, if you know the ASIN for the product on Amazon, you can enter it instead, and this information will be used to create the product on Amazon.
If there are any applicable item specifics or condition information that need to be added, you can do so at this time.
You can also choose whether to export the inkFrog product description or enter your own.
Once all necessary information has been added, select Save Settings. The needs review product status will then be updated to exporting as a new product.
To send a custom description to Amazon, you need to turn off the sync settings in inkFrog for syncing descriptions in both directions.

After selecting the Export button, the listings will be sent to Amazon. Once the export process is complete, a results page will be displayed. Any listing that fails to be created on Amazon will appear on this page, along with an explanation for the failure.

For example, the above export failed because a product identifier (UPC/EAN/ISBN/MPN/ASIN) is required by Amazon. To fix this, edit the eBay listing in inkFrog to add a product identifier, then attempt the export to Amazon once again.
The product is automatically linked to the eBay listing and will sync with eBay according to the store sync settings within inkFrog.
The product is automatically linked to the eBay listing and will sync with eBay according to the store sync settings within inkFrog.
Link existing eBay Listings to Amazon Products
When connecting Amazon to inkFrog, you can map (link) existing eBay listings to your store products. This is a simple process, and it works best when the titles of the listings and the store products match, although it can also be done when they do not match.
Mapping occurs on the Import from Store page. Simply select the listings you want to import or choose to import all. On the Review page, the status of each listing will be displayed. The software will attempt to map the listings automatically, but you can also map them manually if needed.
**When a blue link symbol shows next to the title of the product(s) in the list, this indicates that when the import completes, the Amazon product will be mapped/linked with the eBay listing in inkFrog.
**When a blue link symbol shows next to the title of the product(s) in the list, this indicates that when the import completes, the Amazon product will be mapped/linked with the eBay listing in inkFrog.
**After the import completes, the Amazon product that is mapped/linked with the eBay listing in inkFrog will immediately begin to sync between Amazon and inkFrog for eBay based on how the sync & inventory control settings show selected.
inkFrog > Amazon > Sync & Inventory Control
Automatically Map
On the import page, inkFrog's software will try to automatically match each eBay listing to the corresponding store product. If a match is found, a blue link will appear next to the listing on the review page just before importing.

If you wish to import a product as a new listing instead of linking it to an existing eBay listing, you can click on the title of the product on the left side of the page. On the right side of the page, scroll down until you see the section where you can make changes to the listing information. Here, you can deselect the option to link to the existing eBay listing and choose to list the product as a new eBay listing.

- Unlink Listing: This will un-map (un-link) the selected listing from the existing eBay listing, and it will be imported as a new listing to eBay.
- Unlink all listings: This option will un-map (un-link) all the listings, including those still waiting to import on the import from store page, and they will be imported as new listings for eBay.
- If you want to check which eBay listing the selected listing is linked to, select the listing title link where it reads "This product has been linked to the existing listing".
To finalize the mapping process, select the "Import & List" button and choose "Import & List to eBay" to send the existing listings to eBay if they are not yet live, or "Import Only" to simply connect the store products to the existing eBay listings.
Manually Map
If the store products are not automatically linked in order to map to existing eBay listings on the review page, they may be manually mapped to create the sync.
1) Select the title on the left side of the page that you wish to map.
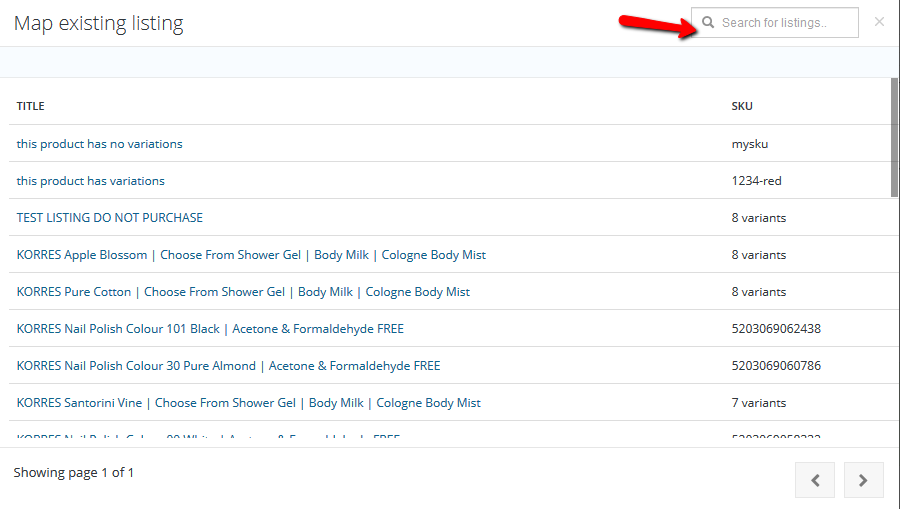
2) On the right side of the page, choose the Map to existing listing button.

3) In the pop-up window, click on the title of the listing you would like to map to or use the search field to enter a keyword and then hit enter on your keyboard to complete the search. Once you locate the matching listing, click on the title.

4) Once the title is selected, if it is a single item listing, the blue link will appear indicating that once the import is finalized, the product will map to the existing eBay listing. If you're mapping a product that contains variants, there is an extra step of making the selections of tying each variant from the store product to the existing eBay variants.
The eBay listing must contain the same number of variants as the store product in order to map successfully.

Was this article helpful?


