Shopify Connection
Connect Shopify & eBay to inkFrog
Level Up Your E-Commerce with inkFrog + Shopify
Running an online store doesn’t have to be a juggling act. Integrating inkFrog with Shopify is your secret weapon for smoother operations and bigger business wins!
With just a few steps, you can:
- Streamline Like a Pro: Manage your inventory in one place—no more double-checking or second-guessing.
- Shine Everywhere: Keep your product listings consistent across platforms, so your brand always looks its best.
- Automate the Grind: Save time with automatic updates, freeing you up to focus on growth and customer happiness.
The best part? It’s simple to set up, and the benefits are huge. Start your integration today and see how inkFrog and Shopify make running your business feel like a breeze
To start using inkFrog, you can either sign up for an account on the website at https://www.inkFrog.com or install the inkFrog Open app from within the Shopify app market at https://apps.shopify.com/inkfrog-open
Shopify Sync Settings
Stay in Sync: Managing Shopify and eBay with inkFrog
Effortlessly manage the flow of information between Shopify and eBay with inkFrog’s sync settings.
Here’s how to get started:
- Head to your inkFrog dashboard.
- Select the “Apps” tab.
- Click on “Sync & Inventory Control” to customize your settings.
With these tools, you’ll have full control over your inventory and listings, ensuring everything runs smoothly across both platforms. Keep your business connected and in sync with inkFrog!

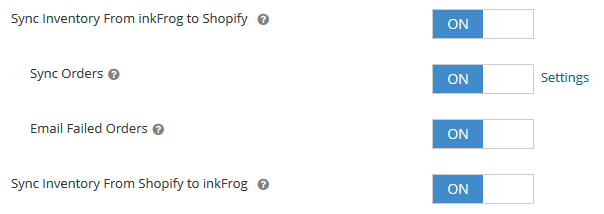
Inventory & Order Sync
Seamless Inventory and Order Syncing with Shopify and eBay
Take control of your inventory and orders with inkFrog’s flexible syncing options between Shopify and eBay:
- Inventory Syncing Made Simple:
- If you’re tracking inventory in Shopify, you can sync stock levels between Shopify and eBay for real-time updates.
- Not tracking inventory in Shopify? No problem! Your eBay listings will import with a quantity of 1 and automatically restock to 1 each time the product sells.
- Effortless Order Management:
Enable order syncing to streamline your workflow. Orders placed on eBay for products linked to Shopify will automatically appear in your Shopify account. This lets you fulfill orders directly in Shopify while ensuring eBay is updated with the latest order status.
Fine-Tune Your Inventory Sync with eBay and Shopify
Managing inventory across eBay and Shopify just got smarter with inkFrog’s advanced sync settings! Here’s how to make the most of these features:
1. Allow Separate Inventory Quantity on eBay
Offer a lower quantity on eBay than what's available in Shopify by enabling this setting. It’s perfect for creating exclusivity or managing stock allocation across platforms.
2. Restock eBay Inventory
Keep your eBay inventory updated when restocking Shopify:
- Example: If your eBay quantity is 3 and Shopify is 5, increasing Shopify to 11 will also increase eBay by 6, making it 9.
- You can even set a limit to control the maximum restock amount.
3. Automatically Restock eBay Inventory
Stay ahead with automatic restocking:
- Example: If you set "When Quantity Reaches 1, Set to Fixed Amount 2," the eBay quantity will restock to 2 whenever it drops to 1 (provided there’s enough stock in Shopify).
4. eBay Quantity Import Limit
Control how much inventory is imported to eBay:
- Set a cap for imported product quantities from Shopify.
- Leave it blank to import the full Shopify quantity.
These tools put you in control of inventory flow, ensuring smooth operations and avoiding overselling.

Title, Description, & Price Sync
Master Product Syncing with eBay and Shopify
Keep your eBay and Shopify stores perfectly aligned with inkFrog’s syncing options for titles, descriptions, and pricing. Here’s how it works and what to keep in mind:
Stay Synced Across Platforms
Effortlessly update product details like:
- Titles
- Descriptions
- Pricing
Changes made on one platform can automatically sync to the other, saving you time and maintaining consistency.
Customizing eBay Listings? Pause the Sync!
Planning to tweak titles, descriptions, or pricing specifically for eBay?
- Turn off the sync settings (in both directions) to prevent accidental overwrites.
- This allows you to customize your eBay listings without impacting your Shopify settings—or vice versa.
With these options, you can enjoy the flexibility of unique listings while ensuring key details stay consistent where it matters most. Customize, sync, and grow your business your way!

Smart Pricing Sync: Shopify and eBay, Your Way
Keep your sale pricing in check across platforms with inkFrog’s "Set eBay Price to Sync" setting! This feature gives you the power to adjust eBay pricing relative to your Shopify prices for seamless sales and strategic pricing.
How It Works
- Customize Pricing Across Platforms:
Adjust your eBay prices to be higher or lower than Shopify prices. For example:- Set eBay pricing to 110% of Shopify pricing to increase prices by 10%.
- Want to lower prices? Set a value under 100% (e.g., 90% for a 10% discount).
- Precision Pricing:
If you set the value to 10%, eBay prices will be just 10% of Shopify prices—a steep discount or a potential typo, so double-check!
Why Use It?
- Run platform-specific promotions.
- Account for different fee structures or shipping costs.
- Stay competitive by tailoring pricing for each marketplace.

Additional Sync Settings
Optimize Your Product Syncing Between Shopify and eBay
Sync smarter with inkFrog’s advanced settings to manage stock, variants, and product imports seamlessly. Here’s a quick guide to make the most of your syncing capabilities:
Stock Management
- Automatic End Listings: When enabled, eBay listings may end if your Shopify product goes out of stock, is deleted, or is hidden.
- Prevent Overselling: Use the “Consider item out of stock if store quantity falls below” setting to add a safety buffer, ensuring there’s no delay between Shopify updating eBay after a sale.
Variant Controls
- Import New Variants: Automatically add new Shopify variants to an existing eBay listing, keeping everything up to date.
- Disable Specific Variants: Don’t want certain Shopify variants to appear on eBay? Enable the “Allow Disabling Variants” setting to remove unwanted options (as long as the eBay listing isn’t live yet).
Import Limits
- Control Your Workflow:
- Use the “Import Limit” setting to set the maximum number of products built on the import page at once—ideal for large catalogs.
- Select “No Limit” to build your entire Shopify catalog for import.
These powerful settings give you control over your inventory and product flow, keeping your eBay and Shopify stores running smoothly and efficiently.
Send from inkFrog to Shopify (Export Feature)
Effortless Product Export: eBay to Shopify
Expanding your Shopify store with eBay listings is a breeze with inkFrog’s export settings. Here’s how to set it up for smooth and efficient product creation:
Category Settings
When exporting eBay listings, decide how categories are handled if no match is found on your Shopify store:
- Do Not Create New Categories: Products will have no category on Shopify.
- Create Matching Categories: Automatically replicate eBay categories on Shopify.
- Use a Default Category: Assign all unmatched products to a default category, such as “Imported from eBay” (this category will be created if it doesn’t already exist).
Duplicate Product Settings
Control how inkFrog handles duplicate products during export:
- Ignore Duplicates: Export all products without checking for duplicates.
- Match by Title: Prevent duplicates by identifying products with the same title, ensuring clean and organized product management.
These settings make it simple to customize your export process while avoiding duplication headaches and keeping your store neatly organized.
eBay Default Listing Settings
Setting Up Default eBay Listing Settings with inkFrog
Ready to streamline your eBay listings? This step is all about setting up your default eBay listing settings, which will also auto-create your shipping, payment, and return profiles. Here’s how to get started:
General Information
Start with the basics:
- Select Your Country
- Enter Your Zip/Postal Code and Location (city, state/province)
- Choose Your eBay Market: If you plan to sell on eBay Motors, select it as your market.
Once this is set, click “Continue” to move forward.
eBay Categories
Choose your parent eBay categories to ensure your products are listed in the right spots:
- Pick Top-Level Categories: Select all possible categories your products will fall under.
- If no categories are selected, inkFrog will attempt to match your products, but the chances of a miscategorization increase.
- Multi-Variation Products: If your Shopify products have variations, double-check that the selected categories support them by reviewing the eBay Multi-Variation Lookup Tool.
You can select between 0 to 5 categories and click “Continue”.
(Note: You’ll adjust subcategories right before product import in the next steps.)
(Note: You’ll adjust subcategories right before product import in the next steps.)
With these settings in place, you’re one step closer to launching your eBay store with inkFrog!

Setting Up Payment and Tax for Your eBay Listings
Let’s get your payment and tax settings ready for seamless eBay transactions. Here’s how to complete this step:
Payment Settings
- Enter Your PayPal Email Address: This will be used for receiving payments.
- Sales Tax Settings: Choose your tax settings based on your business needs.
Checkout Instructions
- Optional: Only necessary if there are special circumstances, such as custom-made products with extended shipping times.
Once everything is set, click “Continue” to move on to the next step.

Setting Up Shipping for Your eBay Listings
Let’s make sure your eBay customers get their products delivered smoothly with the right shipping settings. Follow these steps:
Shipping Type
Choose how you’ll charge for shipping:
- Flat: A fixed shipping fee for all orders.
- Calculated: Shipping fees based on the buyer's location and the weight/size of the product.
- Combination: A mix of both domestic and international shipping options.
Handling Time
Set your Handling Time:
- This is the time between receiving payment and handing over the product to the shipping carrier.
- Be realistic with your handling time to ensure timely fulfillment and to avoid disappointing customers.
Once your settings are in place, click “Continue” to move on to the next step.

Setting Up Shipping and Returns for Your eBay Listings
You're almost there! Let's wrap up your shipping and return policies for a smooth eBay experience:
Shipping Settings
- Domestic Shipping Services:
- Select your domestic shipping options.
- You can Add Additional Shipping Services if you want to provide customers with multiple choices at checkout.
- International Shipping Services:
- Select your international shipping options, or leave it unchanged if you do not ship internationally.
- You can Add Additional Shipping Services here as well for more customer flexibility.
Click “Continue” to proceed.
Return Policy Settings
- Return Policy:
- If you do not accept returns, simply uncheck the box.
- If you do, choose the number of days the item can be returned (eBay recommends 30 days).
- Select how refunds will be processed, who will cover return shipping, and if you charge a restocking fee.
- Add any return policy text (Note: Avoid adding direct contact info like email, phone numbers, or URLs).
Once your return settings are configured, click “Finish”.
Final Steps
- After clicking Finish, inkFrog will begin building a list of products available to import from your Shopify store.
- Once the list is complete, you can import all products or manually select which items to publish to eBay.
Remember, you can always update your shipping, payment, and return profiles anytime under Profiles in your inkFrog settings.
And just like that, you're ready to start selling on eBay!
Shopify Multi-Inventory Location in inkFrog
Syncing Inventory with inkFrog
During the initial import of existing Shopify products to inkFrog, the software will automatically use the Shopify location that has the most inventory available for managing stock levels.
Here are a few important things to remember:
- After the import completes: Sync between Shopify and inkFrog for eBay will sync inventory based on the inventory location selected during the initial import. This includes if force sync - Shopify to inkFrog is done in inkFrog.
- Order Syncing: Any orders that sync from inkFrog to Shopify will include the inventory location details required by Shopify.
- Inventory Location: the inventory location can be changed after import using individual edit or Bulk Action Edit
- Individual Edit - select the title or pencil icon of a listing to get to the edit listing page - make the inventory location change - Save in the listing
- Bulk Action Edit You can now quickly update inventory locations across multiple Shopify products using the Shopify Location Bulk Edit tool.
Where to Find It
Go to Library → select one or more check boxes of listings linked with Shopify products → Bulk Actions → Edit Listings → Shopify Location
What You Can Do
- Choose a Location
Use the dropdown to select a new Shopify location for your products. - Change All
Apply your selected location to all visible Shopify products in one step. - View Location Options
- Current Location: See where each product is currently assigned.
- Location with Most Inventory: Automatically selects the location with the highest stock.
- Named Locations:
- If you’ve loaded multiple stores, location names won’t display under Change All for simplicity.
- If you're working with one Shopify store, you’ll see full location names.
- Inventory Safeguard
Products will not be updated if the selected location has no inventory for them. - Expired Shopify Stores
If a connected store has expired, a warning message will appear when you try to load its products. - Shopify-Only View
This tool only displays Shopify products. Listings from other channels won’t appear. - Save All Modified Once you’re done, click Save All Modified to apply your changes. This will also trigger a forced sync from Shopify to update the listings.
This ensures smooth syncing and accurate stock tracking across platforms.
Importing from Shopify
Managing Imports with inkFrog
On the Import page, you'll find two helpful options for managing your product imports:
Refresh Button
- Clicking Refresh will update the list of available NEW products to import from Shopify. This is a quick way to ensure you're viewing the latest data.
Rebuild Button
- Clicking Rebuild will reload all available products from Shopify that haven't yet been imported. This process may take some time, especially if you have a large product catalog.
Select Products to Import & Review
Importing Products from Shopify to eBay
When you're ready to bring your Shopify products into eBay, you have two options for importing:
Import All Products
- This option will import all available products from Shopify in one go. Simply select this option and click the “Next” button to proceed with the full import.
Manually Select Products
- If you'd prefer to choose specific products, this option allows you to handpick which items you'd like to import to eBay.
Settings Button
- The Settings button on the import page gives you access to:
- Initial Setup Settings
- Create Additional Setup Settings
- Sync Settings

Selecting Products or Reviewing Your Import
Depending on your choice, here's what you'll do next:
Manually Select Products
- If you’ve chosen to manually select which products to import from Shopify to inkFrog, simply click the “Select Products” button. This will allow you to choose specific products for import.
Import All Products
- If you’ve opted to import all products, you'll be directed to the “Review, Map, and List” page. Here, you can:
- Review the products being imported.
- Map to existing eBay listings.
- List your selected products on eBay.
Either way, you’ll have full control over your import process, ensuring your listings are accurate and complete!

Manually Selecting Products to Import from Shopify to inkFrog
If you’ve chosen to manually select products, here’s how to proceed:
Select Products Page
- On the "Select Products" page, you can:
- Set filters or use search keywords to display products that belong to the same eBay subcategories.
- Select products for import by clicking the button next to each product title.
- Navigate through multiple pages of products using the pagination arrows at the bottom left of the page.
Once you've selected your products, click “Done” to proceed.
Review, Map, and List Page
- The products you’ve selected will now appear on the “Review, Map, and List” page.
- If you want to add more products to the import, simply click “Add More Products”.
- Once you’ve completed your selections, click “Next” to move forward.
Review Process Tips
- During the review process, make sure to follow eBay’s best practices to optimize your listings:
- Use a Good 'Til Cancelled listing duration (if available).
- Select the correct item condition (e.g., "New").
- Review item specifics, such as brands, product identifiers, and eBay categories.
- Double-check all details for accuracy before finalizing the import.
This ensures that your listings are correctly set up and ready to sell on eBay!

Review, Map, and List Page: Notifications and Symbols
On the "Review, Map, and List" page, you may encounter various notifications to help guide you through the import process. These notifications are indicated by different symbols to provide you with quick insights.

Symbols and Notifications on the "Review, Map, and List" Page
When reviewing and mapping your products for import from Shopify to eBay, you may encounter several helpful symbols indicating the status of each product. These symbols guide you in resolving potential issues and ensuring your listings are accurate. Here's what each symbol means and how to act on it:
Yellow Triangle (Warning)
- Meaning: The software detected that the product has variations, but the selected eBay subcategory doesn’t allow for variations.
- Resolution:
- To allow variations, consider selecting a different eBay subcategory that supports variations. Use this interactive link to find a better subcategory.
- If you choose not to update the subcategory, the product will import, but only the first variant will be sent to eBay.
Orange Triangle (Potential Issue)
- Meaning: The software was unable to determine an appropriate eBay subcategory for the product.
- Resolution:
- Click on the product title to view details on the right side of the page.
- Under Listing Details, click Browse and select the appropriate eBay category & subcategory.
- Complete any required fields (e.g., item condition, specifics) and click Save Settings.
- If no category is updated, the product will not import.
Blue Link (Suggestion)
- Meaning: The product already exists in your inkFrog library, but is not linked to a store product.
- Resolution:
- When importing, the software will map the product to the existing eBay listing, rather than creating a new listing.
- Click on the blue link for more details about the suggested match.
Green Checkmark (Ready for Import)
- Meaning: Everything is correct, and the product is ready to be published on eBay.
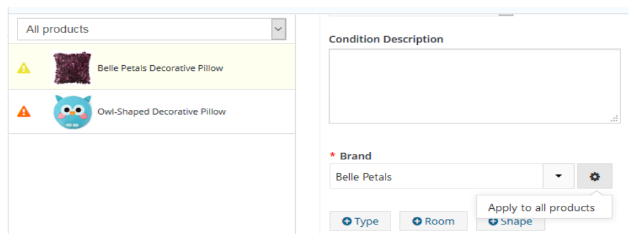
Bulk Category and Brand Management
- Change Category for All Products: If your products share the same eBay category, you can quickly bulk set the category for all products.
- Click the "Change category for all products in list" button and select the appropriate eBay category.
- Bulk Set Brand:
- Click on the title of one product to display the details.
- If the Brand field is available, enter your brand, then click the gear icon next to the Brand field and select "Apply to all products". This will apply the brand to all products in the list.
Final Steps Before Import
Once you’ve made all necessary edits, you can proceed with the import:
- Review all product details (item specifics, pricing, shipping).
- Select the "List All" button to import the products.
- Double-check all information before clicking to ensure correct listings on eBay.
By reviewing and managing these settings and symbols, you'll ensure that your eBay listings are accurate, fully optimized, and ready to go!
Important Notes Before Importing and Listing to eBay
When choosing to Import and List to eBay, it's crucial to keep the following in mind:
eBay Insertion Fees
- Insertion Fees: You will incur eBay insertion fees for each listing created.
- These fees vary depending on the category of the product and the listing duration.
- Be sure to check eBay’s current fee structure to avoid unexpected charges when you proceed with importing and listing products.
Listing Duration and Item Condition
- Listing Duration: Your imported listings will be set to "Good 'Til Cancelled" (if available). This means the listing will stay active until you manually end it or it is sold.
- Item Condition: The imported products will be set to "New" item condition by default.
- Be sure to review and edit item condition if the product is used, refurbished, or has another condition.
Review Listings Before Finalizing
- Always review your listings individually after import to ensure they comply with eBay’s best practices and that all information is accurate.
- Double-check product details, pricing, shipping options, and any required specifics.
Managing Imported Listings
- After the import, your listings will appear in the inkFrog library.
- From the library, you can:
- Edit or revise your listings as needed.
- End or pause any listings if you decide not to sell them.
By being aware of these details and taking the time to review your listings, you'll ensure that your products are properly listed and that there are no surprises in terms of fees or listing details.

Map (Link) existing eBay Listings to Shopify Products
Using the "Map/Link Existing" Option in inkFrog
When using the "Map/Link Existing" option, you can match your Shopify store products to existing eBay listings in inkFrog. Here’s how you can efficiently perform this process:
Steps to Map/Link Existing Products:
- Navigate to the "Map/Link Existing" Page:
After selecting the option, you’ll be taken to the Map/Link Existing page. - Match Store Products with eBay Listings:
- If your store product titles match eBay listings, simply select the appropriate product to link.
- Search Bar: If there’s a mismatch in titles, use the search bar to find the correct product.
- Filters: You can filter products by SKU, product type, or vendor to speed up the search and ensure the correct matches.
- Review and Edit Mapping:
- Once you’ve matched all products, review your mapping.
- If you find any errors or need changes, you can edit the mappings before finalizing the import.
- Blue Link Symbol:
- The blue link symbol next to a product title indicates that the Shopify product will be mapped/linked with the eBay listing after the import.
- Once the import is completed, the linked product will sync between Shopify and inkFrog for eBay based on the sync settings you have configured.
Sync Settings for Linked Products:
- After the mapping is complete and the products are linked, ensure that the Sync & Inventory Control settings are properly configured to manage the product listings and inventory updates between Shopify and inkFrog.
- To access these settings:
- Go to inkFrog > Apps > Channel Connector > Sync & Inventory Control
Automatically Map
Unlinking a Store Product from an Existing eBay Listing
If you need to unlink a Shopify store product from its existing eBay listing and import it as a new listing, follow these steps:
Steps to Unlink and Import as a New Listing:
- Find the "Linked eBay Listing" Section:
- This section will show the existing eBay listing linked to the Shopify store product.
- Click the "Unlink and Import as New Listing" Button:
- By clicking this button, you will unlink the store product from its current eBay listing and create a new listing for it.
- Effect on the Original eBay Listing:
- Unlinking the store product from the eBay listing does not affect the original listing on eBay.
- The original eBay listing will remain active, and a new eBay listing will be created for the same product.

Unlinking Listings and Finalizing Mapping Process
If you need to unlink a product from an existing eBay listing and import it as a new listing, you have the following options:
Unlinking Options:
- Unlink Listing:
- If you select this option, the selected product will be disconnected from its current eBay listing and will be imported as a new eBay listing.
- Unlink All Listings:
- If you select this option, all products on the import page (including those still waiting to be imported) will be disconnected from their current eBay listings and will be imported as new listings on eBay.
Checking Existing Listing Link:
- To verify which eBay listing is linked to a store product, click on the listing title link that says "This product has been linked to the existing listing". This will show you the corresponding eBay listing for that product.
Finalizing the Mapping Process:
Once you’ve reviewed and made all necessary changes to the listings, you can proceed with the import:
- Import & List to eBay:
- Choose this option if you want the listings to be sent live to eBay and are ready for publication. This option is suitable if the eBay listings are not yet live and you want to publish them.
- Import Only:
- Choose this option if you want to connect the store products to the existing eBay listings without sending them live yet. This option is useful if you only need to map the products but are not yet ready to make the listings live.
Manually Map
Manually Mapping Store Products to Existing eBay Listings
If your store products are not automatically linked to existing eBay listings, you can manually map them to ensure proper sync between your store and eBay.
Steps for Manual Mapping:
- Select the Product:
- On the left side of the page, click on the title of the store product that you want to map to an existing eBay listing.
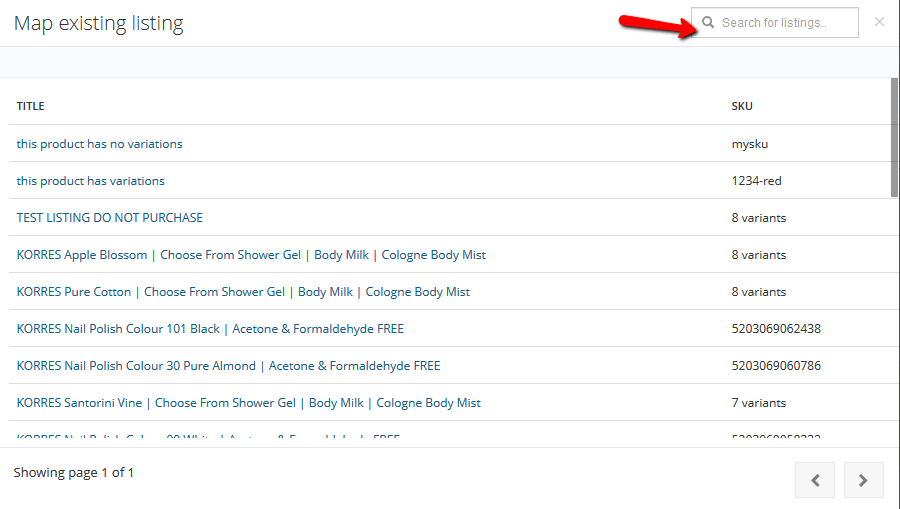
- Open Mapping Option:
- On the right side of the page, click the "Map to existing listing" button. This will open a search box.
- Search for the eBay Listing:
- In the search box, you can search for the corresponding eBay listing by title or item number.
- Select the Correct Listing:
- Once you find the correct eBay listing, select it and click "Map" to link it to your store product.
Mapping Variants:
- If your store product contains variants, you need to match each variant from the store product to the corresponding variant in the eBay listing.
- For successful mapping, the number of variants in the store product and the eBay listing must be the same.
- This ensures that the correct variant information (such as size, color, etc.) is synced between the store and the eBay listing.
Benefits of Mapping:
- Sync Updates: By manually mapping store products to eBay listings, any updates or revisions made in inkFrog will be synced to the corresponding listings on eBay.
- Inventory and Pricing Sync: This helps ensure that your inventory and pricing remain up-to-date across both platforms, reducing the risk of errors and discrepancies.
By properly mapping your products, you'll ensure that your eBay listings reflect the correct product details, variants, and other critical information.


Send From inkFrog to Shopify (Export Feature)
Exporting eBay Listings from inkFrog to Shopify
Before exporting eBay listings from inkFrog to Shopify, it is important to review and adjust the Sync & Inventory Control settings to ensure proper synchronization between the two platforms. These settings help determine how products are mapped and synced between Shopify and inkFrog for eBay.
Steps to Set Up Sync & Inventory Control:
- Review Sync Settings:
- Go to inkFrog > Apps > Channel Connector > Sync & Inventory Control.
- Ensure the desired settings are selected for how products, categories, inventory, and pricing will sync between Shopify and inkFrog for eBay.
- Category Matching:
- Decide what to do with categories that don't match between eBay and Shopify.
- Specify how to handle duplicate products during the export process.
- Export Listings:
- You can either export all listings or manually select the listings you want to export.
- The settings you configure in Sync & Inventory Control will directly impact how products are linked and synced.
Exporting Existing eBay Listings to Shopify:
- Go to Channel Connector:
- Navigate to Apps → Channel Connector → Send from inkFrog to Shopify to begin exporting listings from inkFrog to Shopify.
- Test Export:
- It's recommended to test one or two listings first to see how they will appear in Shopify before proceeding with all products.
- When exported, the product will be created in Shopify with the eBay title, description, images, pricing, and quantity. It will also be automatically linked to the existing eBay listing in inkFrog.
- Product Visibility:
- Make sure the product visibility in Shopify is set to show in your Online Store, so it is visible to your customers.
Important Notes:
- The Sync & Inventory Control settings need to be correctly configured for the desired sync between Shopify and inkFrog to avoid discrepancies between the two platforms.
- Once the export process completes, the product in Shopify will be linked to the eBay listing in inkFrog and will begin syncing based on the settings you selected.
By reviewing the settings and performing a test export, you can ensure that the listings sync correctly and appear as expected in Shopify while maintaining accurate inventory and product details across both platforms.

Manually Selecting Listings to Export from inkFrog to Shopify
If you prefer to manually select which eBay listings to export from inkFrog to Shopify, you can narrow down your choices using a variety of search and filter options. This allows you to target specific listings that meet certain criteria before exporting them to Shopify.
Filter Options:
You can use the following filters to refine your selection of listings:
- Price is: Filter listings by a specific price range.
- Inventory is: Filter listings based on inventory levels (e.g., greater than, less than).
- Was created: Filter listings based on their creation date.
- Was updated: Filter listings based on their last update date.
- Has no variants: Select listings that do not have product variants.
- Has images: Filter listings that include product images.
- eBay status: Filter by the status of the eBay listing (e.g., active, ended).
- eBay listing type: Filter by the type of eBay listing (e.g., auction, fixed price).
- eBay market: Filter by the eBay marketplace (e.g., US, UK).
- eBay account: Filter by the specific eBay account associated with the listings.
Steps to Manually Select Listings:
- Apply Filters: Use the search and filter options to narrow down your list of eBay listings based on your chosen criteria.
- Select Listings: Once the listings are filtered, review the products and select those you want to export to Shopify.
- Export Listings: After making your selections, click the "Done" button to begin the export process.
Once the export is complete, the selected listings will be created as products in Shopify and automatically linked to their corresponding eBay listings in inkFrog.
By using these filters, you can streamline the export process and ensure that you only export the listings that meet your specific requirements.

Review and Export eBay Listings from inkFrog to Shopify
After selecting the listings you wish to export from inkFrog to Shopify, follow these steps to review and finalize your export:
Steps for Reviewing and Exporting Listings:
- Click "Next": After making your selections, click the "Next" button to proceed to the review page.
- Review Your Selections: On the review page, you'll see a summary of the listings you've chosen for export. Here, you can:
- Check the details of each listing.
- Ensure that the product categories, pricing, and other details are correct.
- Make Adjustments:
- If any changes are needed (such as adjusting the eBay category), click the listing title of the item you want to edit.
- After making your adjustments, click "Save" to confirm the changes.
- Finalize Export: Once you are satisfied with your selections and any changes you’ve made:
- Click the "Export" button to send the listings to Shopify.
Once the export is complete, the selected listings will automatically be created as products in Shopify, with their details (title, description, images, pricing, and inventory) linked to the corresponding eBay listings. The syncing process will also begin based on the Sync & Inventory Control settings you've selected.
Handling Custom Descriptions and Sync Status
When exporting eBay listings from inkFrog to Shopify, the sync settings play a crucial role in determining how the product descriptions are handled. Here's how to manage custom descriptions and review the status of the export:
Custom Description Settings:
- Custom Descriptions: If you’ve chosen to use a custom description for your store product, it will only be exported as intended if the sync settings are properly configured.
- Sync Settings for Custom Descriptions:
- Sync description from inkFrog to Shopify: Should be set to off.
- Sync description from Shopify to inkFrog: Should also be set to off.
- Sync Settings for Custom Descriptions:
Export Status Page:
After the export process completes, you will be shown a status page where you can review the success of the operation. Here's what you'll see:
- Success: Listings have been successfully created as Shopify products.
- Fail: Listings could not be created due to an issue. A status message will be provided to explain why.
- Skipped: Some listings were skipped, possibly due to configuration issues or because they didn't meet certain criteria.
Each listing will also have a link provided to view and edit the product directly in Shopify.
This status page will help you quickly identify and correct any issues, ensuring a smooth export process.
Was this article helpful?