Sold eBay Orders
Congrats on Your First eBay Sale!
You've unlocked the world of online selling, and inkFrog is here to make managing your orders a breeze! Ready to dive in? Let’s go!
🛒 Here’s How to Handle Your Order Like a Pro:
- Log in to inkFrog and head over to the "Sold" section. This is your hub for everything order-related.
- Update the order status—whether it’s paid, shipped, or both. Do this in inkFrog or directly on eBay, and we’ll keep both platforms in perfect sync for you.
- Using a store to sync orders? Fulfill the order in your store, and watch the magic happen as the status flows seamlessly into inkFrog and then over to eBay.
📝 Order Insights at a Glance
In the "Sold" section, you’ll find all the info you need:
- inkFrog Order ID
- Order Date
- Customer Name
- Total Cost
- Paid Amount
- Shipment Status

🔍 Quick Peek at Your Sold Listings
Want a fast way to see the details of your sold items? Just click the + icon to the left of any order in the "Sold" section.
This handy feature gives you a quick view of the sold listing, displaying key details without diving into the full listing. It’s the perfect way to access important info at a glance and keep things moving smoothly!

Individual Order Update
📋 Dive Deeper into Your Orders
Need the full scoop on an order? Simply click the order number to open the Order Details page, where you can take control with these actions:
- Mark as Payment Received: Confirm the payment’s in and keep your records up to date.
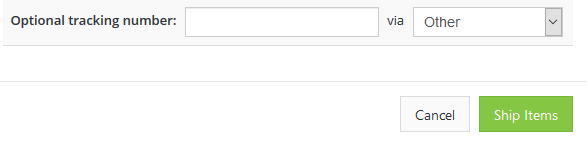
- Ship Items: Mark the order as shipped and add carrier or tracking details to keep your customer in the loop.
🔑 Pro Tip: After entering shipping info, always click Ship Items to save your updates. This keeps everything synced and ensures accurate order tracking for you and your buyer.

Using Filters
🔍 Customize Your Sold Orders View with Filters
Need to find a specific order fast? With multiple filters at your fingertips, you can customize your view and narrow down your search with ease!
Apply a variety of filters based on criteria like payment status, shipment status, or order date—use as many as you need to refine your results and quickly locate the orders you're looking for. It’s the perfect way to stay organized and efficient!

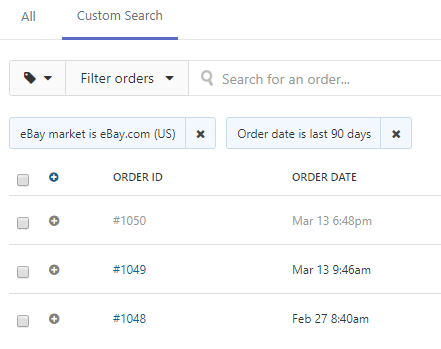
Example: Narrow Down Your Sold Orders with Filters
Let’s say you want to view orders from the eBay.com market that were placed in the last 90 days.
Here’s how you can easily do it:
- Apply a filter for the eBay.com market.
- Then, set a filter for the order date to cover the last 90 days.
By combining these two filters, you’ll get a customized view of your sold listings based on the exact criteria you need. It’s the perfect way to stay focused and find the right orders in no time!
Save Your Favorite Filters for Easy Access
If you find yourself using the same filter setup over and over, why not save it for quick access?
Here’s how:
- Set up your filters as usual.
- Click on Save Search.
- Give it a custom name, and voila! Your saved search will appear as a quick tab at the top of the live page, ready for you to use whenever you need it.
No more reconfiguring—just one click and you're back to exactly what you need!

Easily Delete Saved Search Tabs
Need to clean up your saved searches? It’s a breeze!
- Click on the saved search tab you want to remove.
- Hit the trash button located to the right of the Save this search button.
This will instantly delete the saved search from your quick tabs, keeping your view tidy and organized.
🏷️ Organize Orders with Quick Filters by Label
If you’ve set up order labels, you can take advantage of a quick filter to easily view orders that have specific labels assigned to them.
This feature helps you stay organized by sorting and managing your orders based on your custom labeling system. Just apply the filter and you’ll have all your labeled orders neatly grouped for quick and easy access!

📋 Easily Manage Multiple Orders
When you select one or more checkboxes to the left of your orders, a row of action buttons will appear in the top-right corner of the screen.
This gives you quick access to a variety of options to manage your selected orders, helping you handle multiple tasks at once.

🔄 Order Management Tools at Your Fingertips
Here’s a quick rundown of your navigation and management options:
- Pagination Arrows: Use these to navigate between pages of your live listings. Plus, you can set a filter for page size to display up to 250 orders per page, giving you more control over what you see at once.
- Manage Order Labels: Add or delete labels to your orders with this option, making it easy to organize and categorize your listings.
- Refresh: Keep your information fresh by clicking Refresh to import any new sold orders from eBay, ensuring everything stays up to date.
- Bulk Actions: The Bulk Actions menu expands to reveal a variety of options for managing multiple orders at once, saving you time and effort.

🛠️ Bulk Action Options for Efficient Order Management
Here’s how you can manage multiple orders at once with Bulk Actions:
- Archive Orders: If an order is completely fulfilled, you can archive it by selecting this option. It will turn the text to a faded grey, keeping your active order view clutter-free.
- Unarchive Orders: Accidentally archived something? No worries—just choose Unarchive Orders to bring it back into the active list.
- Print Orders: Using inkFrog print templates? This option formats your templates (invoices/labels) with the details for the selected orders, making printing a breeze.
- Apply Label: Need to organize? You can bulk assign labels to the selected orders all at once.
- Paid: Bulk change the paid status for the selected orders to reflect payments received.
- Shipped: Bulk update the shipped status for your selected orders to keep customers informed.
- Paid & Shipped: Need to update both statuses at once? Use this to bulk change both the paid & shipped statuses.
- Force Synchronization: Depending on whether you have a store linked to inkFrog or not, force syncing orders can provide different syncing options, ensuring everything is in sync across platforms.
These options make managing large volumes of orders quick and simple!
Failed Order Sync
🚨 Handling Failed Order Syncs
If an order fails to sync from inkFrog to your store due to an error, the software will automatically retry syncing. However, if the error persists, inkFrog will stop attempting the sync.
Here’s how you can manage and resolve these issues:
- Review Failed Orders:
- Go to eBay → Sold.
- Apply the filter for "not linked to store" to find any orders that failed to sync.
- Email Alerts: If you have email alerts set up for failed syncs, you’ll receive a detailed email about the issue, including the reason behind the failure.
- Force Sync the Order: After receiving the alert email, you can force sync the order from inkFrog to your store:
- Go to eBay → Sold.
- Select the checkbox for the failed order.
- Click the Bulk Actions button and choose "Force Sync".
- Select "inkFrog to your store" and complete the sync process.
Important:
- If prompted, do not select to sync inventory, as inkFrog has already adjusted it based on the details in the email.
- If the order continues to fail syncing, there might be some underlying issues. Don’t worry—our customer care team is here to help, so feel free to reach out for assistance!
This process ensures you stay on top of syncing issues and helps you resolve them quickly!
Was this article helpful?