Bulk Actions: eBay Listings Bulk Edit
Ready to take your listings to the next level? In the library, simply select your listings, and then click the Bulk Actions button. This handy button will appear at the top right of your screen once you’ve selected at least one listing.
Edit Listings
List or Relist to eBay
Show me how
Send Listings to eBay
When you're ready to send your listings to eBay, here’s how it works:
- List to eBay: Sends your listings to eBay as brand-new listings.
- Relist to eBay: Sends your selected listings as relisted items.
Selecting Listings
Start by choosing the check box next to each listing you want to send to eBay. Once you’ve selected at least one listing, you’ll see the following options:
Start by choosing the check box next to each listing you want to send to eBay. Once you’ve selected at least one listing, you’ll see the following options:
Options:
- Check Errors and Fees: Click this option to view a list of your selected listings, check for any errors, and get an estimate of eBay fees.
- Post All Listings Matching Current Search: If you’ve used the “select all” checkbox on the library page, clicking this link will send all listings in the library to eBay, not just the selected ones. Want only the listings you've specifically selected to be sent? Don’t click this option!
- When Would You Like These Listings to Be Submitted?
- Launch Immediately: If you're ready to go live, just click this option and hit the Submit button.
- Schedule for Later: If you want to schedule the listings for a future time, choose a date from the drop-down menu, set the scheduled time, and decide if you want a time delay between listings. Once you’ve set your preferences, hit Submit.
After You Submit
- Immediately Launch: Your listings will appear in the Scheduled Folder while they're being sent to eBay.
- Scheduled Launch: Your listings will stay in the Scheduled Folder until the scheduled date and time for them to go live.
And that’s it! Now you’re all set to send or schedule your listings with ease!

Force Synchronization
Show me how
Make Your Listing Selections
Start by selecting the checkbox next to each listing or simply choose Select All. This will be the group of listings you’ll sync.
Once you've selected your listings, click on Force Sync. A menu will appear with several options based on whether you’re using inkFrog with eBay only or if you have other store connections (e.g., Shopify, Amazon).
eBay to inkFrog Sync
This option syncs listing details from eBay back into inkFrog. If you have a store connection, note that this sync may also update your store products based on your sync settings.
- Update Images & Descriptions: If you select this, inkFrog will pull in eBay’s images and descriptions.
Important: Updating descriptions from eBay is not recommended if you’re using inkFrog’s description templates, as eBay stores template code along with the description text, which could lead to unwanted formatting issues.
It’s generally better to make description revisions in inkFrog and sync those changes to eBay.
Once you're ready, you can choose between:
- Sync Listings: This will only sync the listings you’ve selected in the library.
- Sync All Listings Matching Current Search: This will sync all listings in the library, including those you haven’t selected.
inkFrog to eBay Sync
When you choose to force sync inkFrog to eBay, you have several options to tailor what gets updated. Here’s what you can select:
- Description & Images
- Title
- Quantity
- Price
- Variants
- SKU
- Listing Profile
- Return Profile
- Payment Profile
- Shipping Profile (required)
- Buyer Requirements
- Subtitle
For Multi-SKU Listings:
If you choose to update any of the following—Quantity, Price, Variants, or SKU—ALL four elements will be updated across your multi-SKU listings on eBay.
What Happens Next:
Once you've made your selections, you can choose one of these options:
- Sync Listings: This will update only the listings you’ve selected from the library.
- Sync All Listings Matching Current Search: This will sync every listing in the library, even those you didn’t select.
Make sure to check your settings and selected listings before syncing!
inkFrog to Store
When syncing from inkFrog to your store, the available options will vary depending on which type of store connection you have set up (e.g., Shopify, Amazon).
Important:
When you choose to force sync inkFrog to your store, the sync will follow the settings you’ve enabled or disabled for the store. Be sure to double-check your sync settings before proceeding, as this action cannot be undone once completed.
What You Can Do:
- Sync Listings: This will update only the listings you’ve selected from the library.
- Sync All Listings Matching Current Search: This will sync every listing in the library, even those you haven’t selected.
Before syncing, ensure your sync settings are accurate to avoid unintended updates!
Store to inkFrog
The available options will vary depending on the type of store connection you have set up with inkFrog (e.g., Shopify, Amazon).
Store to inkFrog
The available options will vary depending on the type of store connection you have set up with inkFrog (e.g., Shopify, Amazon).
Important:
When you choose to force sync from your store to inkFrog, the sync will follow all the settings you’ve enabled or disabled for both your store and inkFrog/eBay. Please make sure your sync settings are configured correctly before proceeding, as this action cannot be undone once completed.

Best Offer
Show me how
Select the desired listings by choosing the checkbox to the left of each listing or choose select all.
Select "Edit options" and choose "Add Best Offer" for the selected listings.
In the popup, choose to Edit this page of listings only or Edit all listings at once and select Next.
If we selected to edit this page of listings only, on the next page we're able to enable or disable Best Offer per listing or for all listings at once. We may also set the auto-accept and auto-decline (optional) per listing or for all listings at once.
Once the changes are complete, select Save all modified.
If we've chosen to Edit all listings at once, set the values in the popup, and select Edit Listings.

Buyer Requirements
Show me how
- Select the listings you want to edit by choosing the check box to the left of each listing, or choose "Select all".
- Choose "Buyer Requirements". In the popup, select "Edit this page of listings only" or "Edit all listings at once" and select "Next".
- If you chose to edit this page only, you can set the buyer requirements for all selected listings at once or for each individual listing.
- After making your changes, click "Save all modified".
- If you chose to edit all listings at once, set the values in the popup and select "Edit Listings".

eBay Store Category
Show me how
To edit eBay store categories for multiple listings, follow these steps:
- Select the desired listings by choosing the checkbox to the left of each listing or choose select all.
- In the popup, choose to Edit this page of listings only or Edit all listings at once and select Next.
- If you selected to edit this page of listings only, on the next page, you can select the eBay store category per listing or for all listings at once.
- Once you've completed the changes, select Save all modified.
- If you've chosen to Edit all listings at once, select Next, then choose the values in the dialogue box, and select Edit Listings.
NOTE: If you have multiple eBay accounts within the same inkFrog account, you must set a filter in the library for eBay account before initiating the bulk edit in order to display the "change all" option.

Item Condition
Show me how
Make the listing selections by choosing the check box to the left of each listing or choose select all. Select Item Condition.
In the popup, choose whether to Edit this page of listings only or Edit all listings at once and select Next.
If we choose to edit this page of listings only, on the next page we can change the item condition for each selected listing individually.
Once we have completed the changes, select Save all modified.
If we have chosen to Edit all listings at once, set the desired condition in the popup and select Edit Listings.
Please note that the eBay condition values offered depend on the specific eBay market and sub-category being used. Therefore, the listings will only be edited if they are using the specified values for the market and category.

Item Specifics
Show me how
To bulk edit item specifics, follow these steps:
- Make the listing selections by choosing the check box to the left of each listing or choose select all.
- Select Item Specifics.
- On the next page, you can update item specifics per listing or for all listings at once.
- Note that the item specific values change depending upon the eBay category selected for the listings. Required item specifics are noted with a red asterisk.
- To change all at once, for example, enter Brand in the Name field and enter the Brand value in the Value field, then click Update all. If the brand is required on some listings, it will be filled in with the specified value. If brand is not required, a custom item specific will be created for those listings using the brand value. Then select save all modified.
- To change the item specifics per listing, enter the values for each required item specific. You may choose from those that eBay provides or enter your own.
- To add custom item specifics, select Add a custom detail, enter a custom detail label and a custom detail value.
- Once the changes are complete, select Save all modified.
NOTE: Due to the large number of item specifics available for certain eBay categories, bulk editing item specifics for individual listings is limited to a maximum of 10 listings at a time. In order to edit more listings, please use the "Item Specifics (Apply All)" menu option instead.

Handling Time
Show me how
- Make the listing selections by choosing the check box to the left of each listing or choose select all.
- Select Handling Time.
- In the popup, select to Edit this page of listings only or Edit all listings at once and select Next.
- If we selected to edit this page of listings only, on the next page we're able to change all of the listings at once or set a handling time for each individual listing. Please note that if we're using shipping profiles, handling time should be updated within the profile and not using bulk edit in the library.
- Once we've completed the changes, select Save all modified.
- If we've chosen to Edit all listings at once, set the value in the popup and select Edit Listings.

Listing Duration
Show me how
- Make the listing selections by choosing the checkbox to the left of each listing or choose select all. Select Listing Duration.
- In the popup, select to Edit this page of listings only or Edit all listings at once and select Next.
- If we selected to edit this page of listings only, on the next page, we're able to set the duration for all of the selected listings at once or set the duration individually per listing.
- Once we've completed the changes, select Save all modified.
- If we've chosen to Edit all listings at once, set the value in the popup and select Edit Listings.
- Please note that the eBay offers various durations which are dependent upon which listing type and/or eBay category are being used. There can be instances of eBay rejecting this revision due to these restrictions.
Listing Title
Show me how
- Select the listings by choosing the check box to the left of each listing or choose select all.
- Select Listing title.
- In the popup, choose whether to edit this page of listings only or edit all listings at once and select Next.
- If editing this page of listings only, on the next page, we're able to add text to the beginning or end of the existing titles or edit the titles per individual listing. Please note that eBay limits the characters in titles to 80.
- Once we've completed the changes, select Save all modified.
- If editing all listings at once, set the values in the popup and select Edit Listings.

Location
Show me how
- Select the listings to edit by checking the box to the left of each listing or select all.
- Click on "Location" from the available options.
- In the popup, choose whether to edit only the selected listings on the page or all listings at once, and then click "Next."
- If editing only the selected listings on the page, enter the postal code and location for each listing, or enter the details for all listings at once.
- Once changes have been made, select "Save all modified."
- If editing all listings at once, set the values in the popup and select "Edit Listings."

Package Details
Show me how
- Choose the listing selections by selecting the checkbox to the left of each listing or select all.
- Select Package details from the available options.
- In the popup, choose to either Edit this page of listings only or Edit all listings at once and then click Next.
- If you selected to Edit this page of listings only, enter the values that will change and be shared in all of the selected listings in the popup.
- Once you've completed the changes, select Apply package details to apply the changes.
- If you selected to Edit all listings at once, in the popup, enter the values that will change and be shared in all of the listings, then click the Edit all xxx listings matching current search link to apply the changes.

Price
Show me how
- Make the listing selections by choosing the check box to the left of each listing or choose select all. Select Price.
- We can either change the pricing per listing or for all listings at once.
- To change pricing per listing, enter the values, and then select save all modified.
- To change all of the selected listings at once, click the Adjust Prices button.
- A popup will appear with various price change options. Choose only those price fields you wish to change.
- Select whether to add or subtract from the current price, and whether to use a dollar amount or percentage for the change.
- Enter the dollar value or percentage, and then select Adjust prices.
- The changes made within the popup will apply to all of the selected listings on the page.
- Click Save all modified to save the changes.

Product Identifier
Show me how
- Select the listings you want to edit by checking the box to the left of each listing, or choose "Select All."
- Click on "Product Identifier" and select "Edit this page of listings only" or "Edit all listings at once."
- If you chose "Edit this page of listings only," you'll be taken to a new page where you can add a brand, identifier type, and identifier for each listing individually or for all listings at once.
- Once you've made the changes, click on "Save all modified."
- If you chose "Edit all listings at once," a popup will appear where you can set the values for brand, identifier type, and identifier. Click on "Edit Listings" to apply the changes to all selected listings.

Quantity/SKU
Show me how
To edit quantity and SKU in bulk:
- Select the listings by choosing the checkbox to the left of each listing or select all.
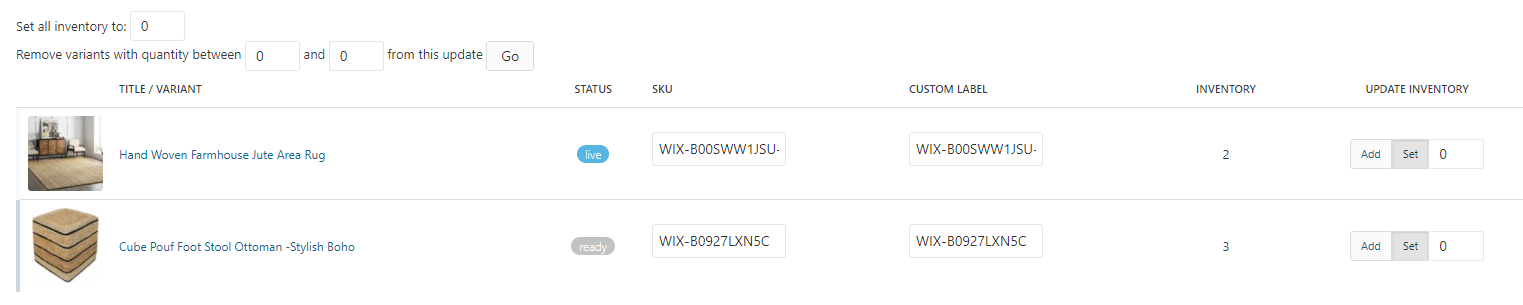
- Click Quantity/SKU.
- To adjust the quantity for each selected listing, select "Show all items." This will display the current quantity for each listing and its variants. You can adjust the quantity on a per-listing basis.
Note: It is not necessary to use "Show all items" to use the "Set all inventory to:" option, but it may help you verify the available quantities.
To remove variants with a quantity between x and x, specify the values for x.
Note: This action is based on eBay quantities, not store quantities.
- If you're changing the SKU, enter it in the "SKU" field.
- After making the necessary changes, select "Save all modified."
Library Actions
Copy (Listings)
Show me how
To make copies of listings in the library, first select the listings by choosing the checkbox to the left of each listing or by selecting "Select all."
Next, click on "Library Actions," and then "Copy."
In the next window, select whether or not you'd like to use images for the copied listings, and then choose "Copy Listings."
If you choose to copy images, the images from the original listing will be included in the copy.
The copies of the selected listings will be created in the library in Ready status.
Delete (Listings)
Show me how
To delete listings from the inkFrog library, select the checkbox to the left of each listing or choose select all to select multiple listings.
Choose Library Actions, and then Delete.
On the next page, select Delete Listings to confirm the deletion.
It's important to note that deleting listings cannot be undone, and any data associated with the listings will be permanently lost.
Additionally, inkFrog syncs with eBay's ended item list, so any listing that has ended within the last 30 days, if deleted from inkFrog, will re-import from eBay. If the listings are within that 30 day time frame, it may be better to use the Hide option in the library rather than deleting the listings.
Export (Listings)
Show me how
To export listings in CSV format, select the listings by choosing the check box to the left of each listing or choose select all.
Then, choose Library Actions, and then Export.
On the next page, you will be provided with options to save the export locally to your computer or open the CSV file.
The exported CSV file can be used to edit the existing listings or as a template to create new listings.
Find & Replace
Show me how
To perform a find and replace on multiple listings in the library, start by selecting the listings you wish to modify by checking the box to the left of each listing, or choose select all.
Next, click on the Bulk Actions button and choose Library Actions, followed by Find & Replace.
In the Find & Replace popup, enter the text you wish to find and the replacement text. You can choose to apply this to the Title, Description, or both. You can also choose to ignore case and use regular expressions if needed.
Once you have entered your preferences, click on Find & Replace to complete.
Please note that for the operation to be successful, the text to be replaced must be identical across all selected listings, including the surrounding code.
Hide Product
Show me how
To hide listings in the library, select the listings and click on the Bulk Actions button. Then, choose Library Actions, followed by Hide Product.
After you've hidden a product, it won't appear in the normal view of the library listings. If you want to see hidden products, apply a filter to display them.
Move to Folder
Show me how
To organize listings into specific folders in the library, first select the listings you wish to move, then click on the Bulk Actions button.
From the drop-down menu, choose Library Actions, followed by Move to Folder.
In the pop-up window, select the folder you want to move the listings to and click on Move Listings to complete the process.
Listing Actions
Assign eBay Account
Show me how
eBay prohibits transferring live listings from one account to another, but ready status listings in the Library can be reassigned to a different eBay account. To end listings, please refer to the "End early" guide in inkFrog.
To assign ready status listings to a new eBay account, select the checkbox of one or more ready status listings in the library and click the Bulk Actions button. Choose Listing Actions and then Assign eBay account.
In the popup, choose to edit either the current page of listings or all listings at once, and click Next.
If we choose to edit the current page of listings only, on the next page we can either change the eBay account for all selected listings, or choose to change the eBay account on a per-listing basis.
Once the changes are completed, click Save all modified.
If we choose to Edit all listings at once, set the values in the popup and select Edit Listings.
Assign Profile
Show me how
When you make changes to a listing profile, all the listings linked to that profile will automatically update. This feature is especially useful when you want to make bulk changes to your listings. If the listings are live on eBay, the changes will also be pushed to the live listings, ensuring that your buyers see the most up-to-date information.
To assign a profile to multiple eBay listings in bulk, follow these simple steps:
- From the library, select the listings that you want to modify and click on the Bulk Actions button.
- Choose "Listing Actions" and then "Assign Profile".
- In the popup, select the profile type and name, and choose "Assign Profile" to apply the profile to only the selected listings in the library.
- Alternatively, select the link to apply the profile to all listings that match the current search.
Please keep in mind that if you select the link to apply the profile to all listings that match the current search, ALL library listings, including those not selected, will be edited to add the selected profile. This can be a time-saving feature that eliminates the need for manual editing of each listing.
Assign Template
Show me how
To assign a template to multiple eBay listings in one go, follow these steps:
- From the library, select the listings that require the template and click on the Bulk Actions button.
- Choose "Listing Actions" and then "Assign Template".
- A popup will appear. Select the template name and choose "Apply Template" to apply it only to the selected listings in the library.
- Alternatively, select the link to apply the template to all listings matching the current search criteria.
- If you choose to apply the template to all matching listings, keep in mind that ALL library listings, including those not initially selected, will be edited to add the selected template.
Auction to Fixed
Show me how
Here's how you can convert auction listings to fixed priced in bulk:
- From the library, select the listings that you want to modify and click on the Bulk Actions button.
- Choose "Listing Actions" and then "Auction to Fixed".
- On the next page, select the desired duration, enter the quantity and pricing per listing, and then click on "Save All Modified".
- If you're using linked listing profiles, it's important to note that the listing type may not be bulk edited from this page for those listings linked to the profile. In this case, you'll need to either edit the profile or unlink it from the listings by bulk editing in the library and selecting the "None" option for the listing profile. After that, you can continue with the bulk edit of the listing type.
Auto Relist Settings
Show me how
To change the auto-relist settings for multiple listings in one go, follow these steps:
- From the library, select the listings that you want to modify and click on the Bulk Actions button.
- Choose "Listing Actions" and then "Auto Relist Settings".
- On the next page, you'll see the following options:
- Set all listings to use account settings
- Disable auto-relist for all selected listings
- Set all products to use product setting relist rules
- Choose the option that suits your needs and click on the corresponding button.
- Once the changes have been applied, you'll see a confirmation message on the screen.
By following these steps, you can quickly and easily change the auto-relist settings for multiple listings.
Fixed to Auction
Show me how
Here's how you can change fixed priced listings to auctions in bulk:
- From the library, select the listings that you want to modify and click on the Bulk Actions button.
- Choose "Listing Actions" and then "Fixed to Auction".
- On the next page, select the desired duration and enter the pricing per listing, and then click on "Save All Modified".
- If you're using linked listing profiles, note that the listing type may not be bulk edited from this page for those listings linked to the profile. In this case, you'll need to either edit the profile or unlink it from the listings by bulk editing in the library and selecting the "None" option for the listing profile. After that, you can continue with the bulk edit of the listing type.
Was this article helpful?
Yes
No
IN THIS ARTICLE
- Edit Listings
- List or Relist to eBay
- Force Synchronization
- Best Offer
- Buyer Requirements
- eBay Store Category
- Item Condition
- Item Specifics
- Handling Time
- Listing Duration
- Listing Title
- Location
- Package Details
- Price
- Product Identifier
- Quantity/SKU
- Library Actions
- Copy (Listings)
- Delete (Listings)
- Export (Listings)
- Find & Replace
- Hide Product
- Move to Folder
- Listing Actions
- Assign eBay Account
- Assign Profile
- Assign Template
- Auction to Fixed
- Auto Relist Settings
- Fixed to Auction